Brightness settings in Windows 11 play a crucial role in enhancing user experience, particularly in terms of visual comfort and energy efficiency.
Understanding these settings is essential for optimizing your display, whether you are working in a brightly lit office or a dimly lit room.
The brightness level can significantly impact not only how you perceive colors and details on your screen but also your overall eye comfort during prolonged use. Windows 11 offers a more streamlined interface for adjusting brightness compared to its predecessors. The settings can be accessed through the Action Center, where users can quickly toggle brightness levels with a simple slider.
Additionally, the integration of adaptive brightness technology allows the system to automatically adjust screen brightness based on the surrounding light, providing a seamless experience that enhances usability and reduces eye strain.
Key Takeaways
- Brightness settings on Windows 11 can be adjusted to suit individual preferences and needs.
- Users can manually adjust brightness on Windows 11 using the keyboard, display settings, or power options.
- Night Light mode on Windows 11 reduces blue light and adjusts brightness for a more comfortable viewing experience.
- Customizing brightness settings for different power plans allows for optimized display based on usage scenarios.
- Troubleshooting brightness issues on Windows 11 may involve updating drivers, checking for software conflicts, or adjusting display settings.
Adjusting Brightness Manually on Windows 11
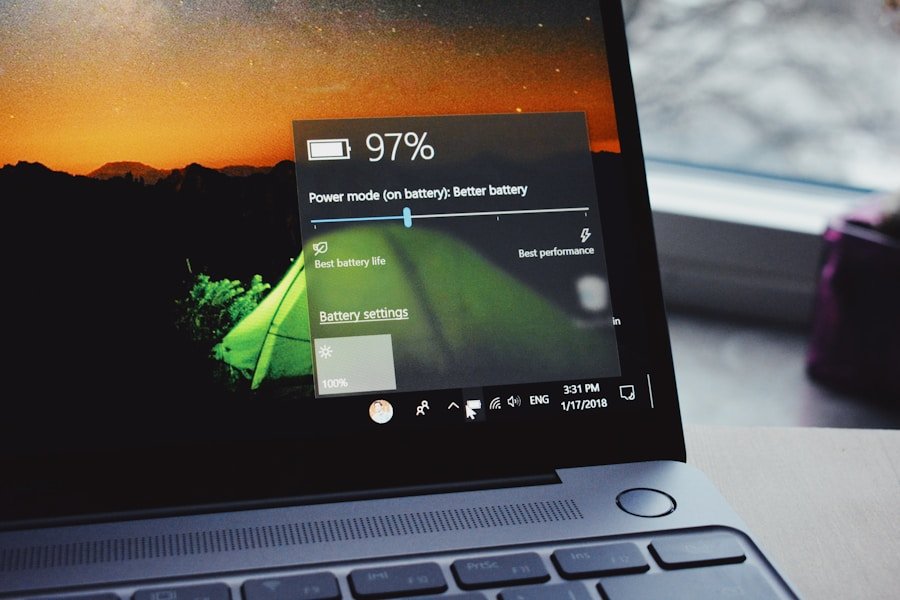
To manually adjust brightness on Windows 11, users can follow a straightforward process that ensures they have control over their display settings. One of the most common methods is through the Quick Settings menu, which can be accessed by clicking on the network, volume, or battery icon located in the taskbar’s right corner. Once the Quick Settings panel opens, users will find a brightness slider that allows for easy adjustments.
By dragging the slider left or right, users can decrease or increase the brightness level according to their preference. Alternatively, users can navigate to the Settings app for more detailed control over their display settings. By selecting “System” and then “Display,” users can find additional options related to brightness and color calibration.
This section not only allows for manual adjustments but also provides options for enabling or disabling features like Night Light and HDR, which can further enhance the viewing experience. For those who prefer keyboard shortcuts, Windows 11 also supports function keys on many laptops that allow users to adjust brightness directly without navigating through menus.
Using Night Light Mode to Reduce Brightness on Windows 11
Night Light mode is a feature in Windows 11 designed to reduce blue light emission from the screen, making it easier on the eyes during nighttime use. This mode not only lowers brightness but also shifts the color temperature of the display towards warmer tones, which can help minimize eye strain and improve sleep quality. Activating Night Light is simple; users can access it through the Quick Settings menu or by navigating to the Display settings in the Settings app.
Once Night Light is enabled, users can customize its intensity and schedule. For instance, you can set it to activate automatically at sunset and deactivate at sunrise, ensuring that your screen adapts to your environment without manual intervention. This feature is particularly useful for those who work late into the night or enjoy using their devices before bed.
By reducing harsh blue light exposure, Night Light mode not only enhances comfort but also contributes to a healthier digital lifestyle. Source: Windows Central
Customizing Brightness Settings for Different Power Plans
| Power Plan | Recommended Brightness Level | Energy Saving |
|---|---|---|
| High Performance | 100% | Low |
| Balanced | 75% | Medium |
| Power Saver | 50% | High |
Windows 11 allows users to customize brightness settings based on different power plans, which is especially beneficial for laptop users who need to manage battery life effectively. Power plans dictate how your device uses energy, and adjusting brightness settings within these plans can lead to significant improvements in battery performance. Users can access power plan settings by searching for “Power & battery” in the Settings app and selecting “Additional power settings.” Within each power plan—such as Balanced, Power Saver, or High Performance—users can set specific brightness levels for both plugged-in and battery modes.
For example, you might choose a lower brightness level when running on battery power to extend usage time while opting for a brighter setting when plugged in for optimal visibility. This level of customization not only enhances user experience but also promotes energy efficiency, allowing users to tailor their device’s performance according to their needs and environment.
Troubleshooting Brightness Issues on Windows 11
Despite the user-friendly nature of Windows 11’s brightness settings, some users may encounter issues where brightness adjustments do not function as expected. Common problems include the inability to change brightness levels or the slider being grayed out. These issues can stem from various sources, including outdated graphics drivers or incorrect display settings.
To troubleshoot these problems, users should first ensure that their graphics drivers are up-to-date by visiting the manufacturer’s website or using Windows Update. If updating drivers does not resolve the issue, users can check their display settings for any misconfigurations. Sometimes, external monitors may have their own brightness controls that need adjustment separately from the laptop’s settings.
Additionally, users should verify that adaptive brightness is enabled if they wish for their device to automatically adjust based on ambient light conditions. If all else fails, resetting display settings or performing a system restore may help resolve persistent issues related to brightness control.
Tips for Optimizing Brightness for Better Viewing Experience on Windows 11

Adjusting Brightness Levels
Consider your environment when adjusting brightness levels. In brightly lit rooms, increasing brightness can help reduce glare and improve visibility, while in darker settings, lowering brightness can prevent eye strain and discomfort. Utilizing ambient light sensors—if available—can also help automate this process by adjusting screen brightness based on surrounding light conditions.
Calibrating Color Settings
Another important aspect is color calibration. Windows 11 provides built-in tools for calibrating color settings, which can significantly impact how images and videos appear on your screen. By accessing the Display settings and selecting “Color calibration,” users can follow a guided process to adjust gamma, brightness, contrast, and color balance. This calibration ensures that colors are displayed accurately and enhances overall visual quality.
Customizing Your Viewing Experience
Furthermore, consider using third-party applications designed for screen adjustment beyond what Windows offers natively. These applications often provide advanced features such as screen dimming beyond the minimum brightness level or customizable profiles for different tasks (e.g., reading versus gaming). By combining these tools with Windows 11’s built-in features, users can create a personalized viewing experience that caters specifically to their needs and preferences.
If you are looking for more tips and tricks on how to customize your Windows 11 experience, you may want to check out this article on appssoftwares.com. They offer a variety of helpful guides and tutorials, including one on how to turn down brightness on Windows 11. Their website also provides information on their terms and conditions (terms and conditions) and privacy policy (privacy policy). So, be sure to explore their site for more useful insights on optimizing your Windows 11 settings.
FAQs
What are the different ways to turn down brightness on Windows 11?
There are several ways to adjust the brightness on Windows 11. You can use the keyboard shortcuts, the Action Center, the Settings app, or the Control Panel.
How do I use keyboard shortcuts to adjust brightness on Windows 11?
To adjust the brightness using keyboard shortcuts, press the “Fn” key along with the brightness adjustment keys on your keyboard. These keys are usually labeled with a sun icon and can be found on the top row of the keyboard.
How do I adjust brightness using the Action Center on Windows 11?
You can adjust the brightness using the Action Center by clicking on the “Expand” button in the lower-right corner of the taskbar, then clicking on the brightness icon and dragging the slider to adjust the brightness level.
How do I adjust brightness using the Settings app on Windows 11?
To adjust the brightness using the Settings app, open the Start menu, click on “Settings,” then select “System” and “Display.” From there, you can use the brightness slider to adjust the brightness level.
How do I adjust brightness using the Control Panel on Windows 11?
To adjust the brightness using the Control Panel, right-click on the Start button and select “Control Panel.” Then, click on “Hardware and Sound,” followed by “Power Options.” From there, you can adjust the brightness settings for your power plan.